
Master Suturing Basics in Dentistry – Complete Step-by-Step Mini Series (With Visual Guide)
Suturing is one of the most essential minor surgical skills in dentistry. From routine extractions to flap surgeries and biopsies, proper wound closure directly influences healing, patient comfort, and overall treatment prognosis.
Whether you are:
- A BDS student learning surgical basics
- An intern/house officer managing clinical cases
- A dental surgeon refining precision and efficiency
This structured suturing mini-series is designed to give you clarity, confidence, and clinical control.
Each episode includes a detailed practical video (linked below) so you can learn visually and apply immediately in clinics.
Why Every Dental Professional Must Master Suturing
Proper suturing is not just about closing a wound — it is about:
- Achieving primary intention healing
- Preventing post-operative bleeding
- Stabilizing mucoperiosteal flaps
- Minimizing dead space
- Reducing infection risk
- Improving esthetic outcomes
- Enhancing surgical confidence
A poorly placed suture can compromise healing. A well-placed suture significantly improves prognosis.
Episode 1 | Suturing Basics in Dentistry
Strong fundamentals create confident clinicians.
This episode builds your conceptual foundation before moving to technique.


In This Episode You Will Learn:
- What is a suture?
- Indications of suturing in oral surgery
- Basic principles of wound healing
- Needle types (cutting, reverse cutting)
- Most commonly used suture needles in oral surgery
- Types of sutures (absorbable vs non-absorbable)
- Common suture materials used in dentistry (Silk, Vicryl, Nylon)
- Suture sizes and their clinical indications
- Instrument handling principles
- Basics of surgical knot tying
Ideal For:
- First clinical exposure (BDS 3rd/Final Year)
- Interns starting oral surgery rotations
- Dentists revising fundamentals
▶ Watch Episode 1 Video Below
Episode 2 | Armamentarium of Suturing
A surgeon is only as good as their instrument handling.
This episode focuses on the complete suturing armamentarium used in dental practice.
Essential Suturing Instruments


Instruments Covered:
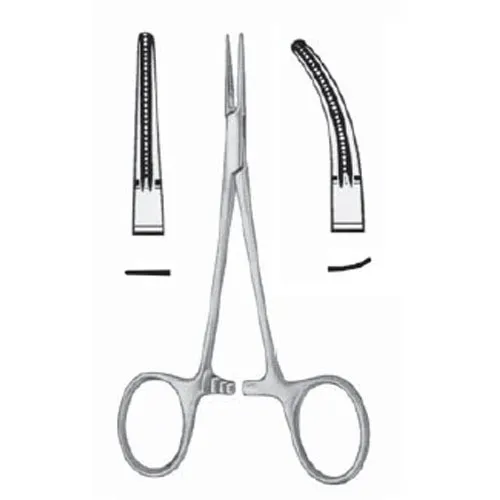
- Needle Holder (Mayo-Hegar) – For controlled needle manipulation
- Tissue Forceps (Adson with teeth) – For atraumatic tissue handling
- Mosquito Forceps (Hemostat) – For clamping small vessels and stabilizing sutures
- Suture Scissors – For precise cutting
- Suture Materials (Silk, Vicryl, Nylon)
- Needle Curvature Selection (3/8 circle, 1/2 circle)
Clinical Insights Included:
- Proper finger positioning in needle holder
- Correct needle loading angle (at junction of middle & posterior third)
- Avoiding crushing of needle tip
- Maintaining asepsis
- Instrument ergonomics in busy OPD settings
- Common beginner mistakes and how to avoid them
Ideal For:
- Interns managing independent cases
- Dentists aiming to improve speed and precision
▶ Watch Episode 2 Video Below
Episode 3 | Simple Interrupted Suture (Step-by-Step Clinical Demonstration)
The simple interrupted suture is the foundation of all suturing techniques in dentistry.
It is the most versatile and commonly used technique in:
- Post-extraction socket closure
- Flap repositioning
- Periodontal surgery
- Minor oral surgical procedures
Step-by-Step Visual Breakdown
Step 1: Proper Needle Loading
Load the needle in the needle holder at the junction of the anterior two-thirds and posterior one-third of the needle (approximately two-thirds from the tip).
- Ensure a firm grip without crushing the needle.
- Position the needle perpendicular to the instrument for optimal control.
Step 2: Needle Entry
Start 3–4 mm away from the wound edge to preserve vascularity and prevent tearing.
- Enter the tissue at 90° to the surface to minimize trauma.
- Use a wrist rotation movement, not the arm, to follow the natural curvature of the needle.
- Avoid pushing the needle straight through — allow it to pass smoothly along its curve.
Step 3: Equal Tissue Bite & Needle Exit
Take equal depth and width bites on both sides of the wound.
- Pass the needle symmetrically to ensure proper tissue approximation.
- Exit at an equal distance (3–4 mm) from the wound margin on the opposite side.
- Maintain tissue eversion for optimal healing.
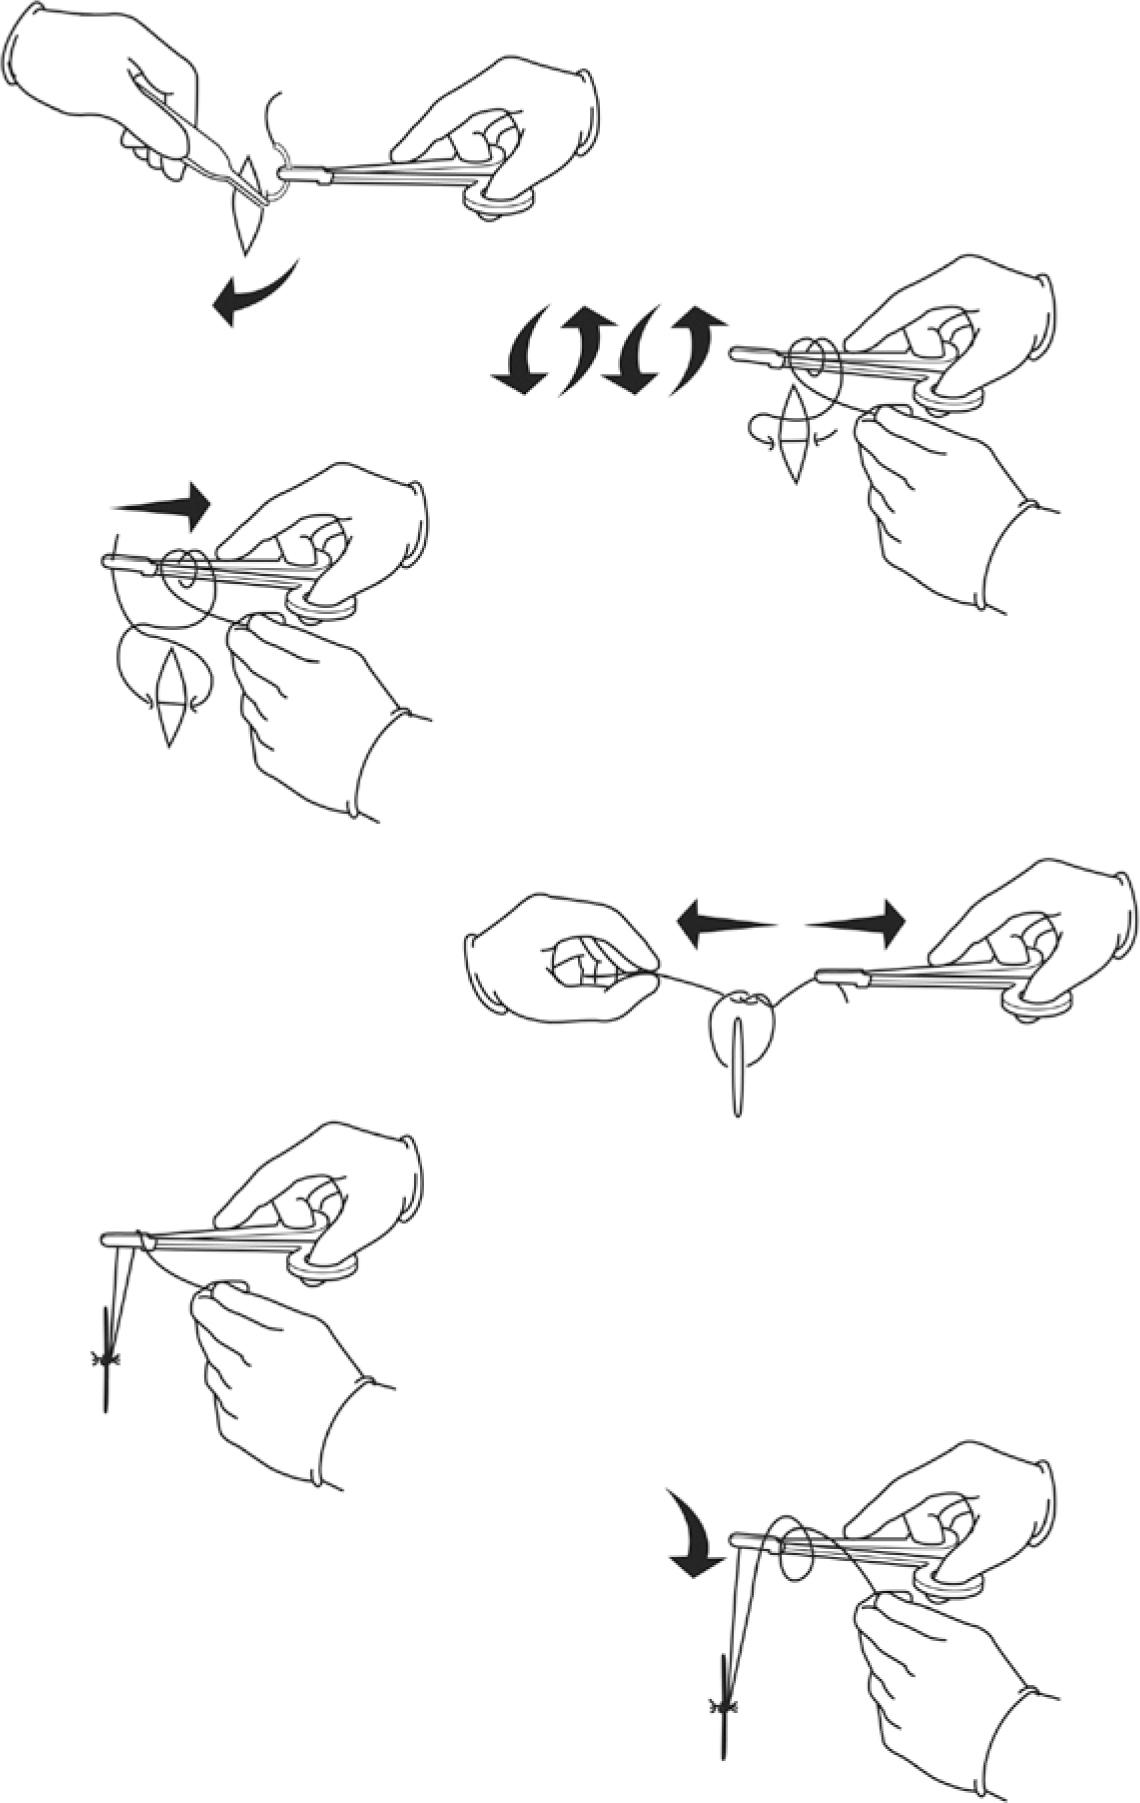
Step 4: Knot Tying (Surgeon’s Knot Technique)
Pull the suture through, leaving a short working tail.
- Begin with a double throw on the first knot for added security (surgeon’s knot).
- Follow with single throws in alternating directions to secure the square knot.
- Apply controlled tension — not too tight (to avoid ischemia), not too loose (to avoid gaping).
Step 5: Cutting the Suture
Cut the suture leaving a 3–5 mm tail to prevent knot slippage.
- Ensure the knot rests to one side of the incision line (not directly over it).
- Confirm stable approximation before trimming.


Clinical Advantages
- High wound stability
- Easy to learn
- Easy to remove
- If one knot fails, others remain intact
- Excellent control over tissue adaptation
- Ideal for beginners and advanced clinicians
Mastering this technique significantly improves surgical confidence.
▶ Watch Episode 3 Video Below
How This Mini-Series Benefits Each Level of Learner
For BDS Students
- Simplifies complex surgical concepts
- Builds early confidence
- Improves viva and OSCE preparation
For Interns
- Enhances real clinical decision-making
- Reduces procedural hesitation
- Improves patient handling skills
For Dental Surgeons
- Refines precision
- Improves workflow efficiency
- Strengthens surgical outcomes
- Reduces post-operative complications
Final Clinical Advice
Suturing is not about speed — it is about:
- Tissue respect
- Precision
- Proper tension control
- Understanding wound biology
Practice consistently on models before clinical application. Repetition builds muscle memory and hand stability.
Follow the complete mini-series and strengthen one of the most important surgical skills in dentistry.